How to Flash and Restore to Stock Samsung Galaxy S7 SM-G930W8 (XAC) Canada
Step by step how to flash and install Samsung Galaxy S7 SM-G930W8 firmware. This tutorial will help you to restore any or all the changes you have made to the system and also revert it back to stock or factory images. This will perform a clean full firmware installation. That means you will lose all your data, app, media etc. Hence, it’s better to backup before you proceed.

This guide will also help you unbrick your Samsung Galaxy S7 device if the Download/Odin Mode is accessible on your Galaxy device. This is a usual Odin flash method common to almost all Samsung Galaxy devices. All you need to do is download the proper firmware file for your Galaxy device and flash it using Odin for PC.
Step 1: Download and Install Samsung USB Driver on Your Computer
Visit the DriverDosh to download the latest samsung usb driver v1.5.63.0. Once drivers are installed, it is highly recommended that you restart your computer.
Step 2: Download the Stock ROM/Original Firmware Galaxy S7 SM-G930W8
Go to this page to download the latest stock nougat firmware for Galaxy S7 SM-G930W8 (XAC) Canada. After downloading the firmware, you need to extract or unzip it to get the firmware file with .tar or .tar.md5 extension and place at a location where you can easily locate it in your computer.
Step 3: Download and Extract Odin Tool on Your Computer
You can download Odin3 v3.12.7 directly from DriverSpace. After downloading it on your computer, extract it to Desktop or another location you'd prefer.
Note:
Samsung Kies is not compatible with Odin Samsung. You have to make sure that Kies is not running in your system tray. It is recommended to uninstall Kies before using ODIN.
After extracting, right click to open "Run as administrator". It may prevent certain issue from happening.

Step 3: Boot Galaxy S7 SM-G930W8 to Download Mode
Make sure your Galaxy S7 SM-G930W8 is disconnected from your computer. Then, boot your phone into the download mode. To do so, power off your device and then press and hold the Volume Down + Home + Power buttons at the same time. Keep the keys pressed until you see the warning screen and then press the Volume Up key to enter the Download/Odin Mode.

Step 4: Connect your Galaxy S7 SM-G930W8 to Computer
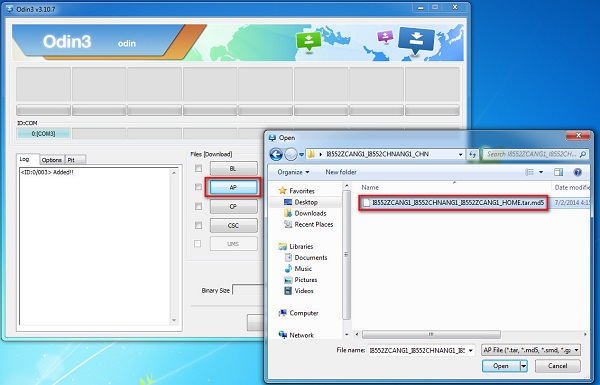
You device should be automatically recognized by Odin. At the lower-left of Odin interface, it should show a message that says "Added!" and in the meantime you should see a light-blue box at the ID:COM section stating "COM:3" (the number depend on which USB port you have plugged the device cable and is irrelevant).

Keep in mind:
You cannot proceed until you get the “Added!!” message which confirms that Odin has recognized your device.
If you don’t get the “Added!!” message, you need to install/re-install the drivers again for your device, and you should use the original cable that came with your device.
Step 6: Click "AP" Button to Add tar.md5 File
Once the device is recognized, load the firmware file that you have extracted into Odin. To do so, click the AP button on Odin and then select the .tar.md5 file.

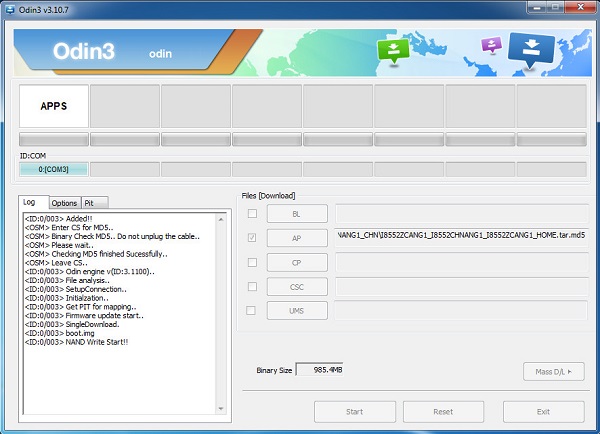
After adding the file, click "Start" button to begin the flashing process. Do not remove or operate on your device until finished or failed showed on Odin.

When the flashing process is done and if everything goes well, you should see a big green box saying "PASSED". By now, the device should be rebooted and it is safe to remove/unplug your device.


This guide will also help you unbrick your Samsung Galaxy S7 device if the Download/Odin Mode is accessible on your Galaxy device. This is a usual Odin flash method common to almost all Samsung Galaxy devices. All you need to do is download the proper firmware file for your Galaxy device and flash it using Odin for PC.
Important Note:
- This firmware file is only for Galaxy S7 SM-G930W8 (XAC) Canada. Don't flash or install this firmware file on any other device.
- Follow the steps correctly, otherwise you may brick your device.
- We are not responsible for any damage to your phone.
- Take a backup of your personal data before flashing or installing the firmware file on your Galaxy S7 SM-G930W8 (XAC) Canada. As this helps you to recover the personal data whenever anything wrong happens.
- Ensure that your phone has at least 60% charged to prevent the accidental shutdown in between the process.
Firmware Description
| Model | SM-G930W8 |
| Model name | Galaxy S7 |
| Country | Canada (XAC) |
| Version | Android 7.0 |
| Changelist | 12046623 |
| Build date | Tue, 08 Aug 2017 08:24:49 +0000 |
| Security Patch Level | 2017-08-01 |
| Product code | XAC |
| PDA | G930W8VLU2BQH1 |
| CSC | G930W8OYA2BQH1 |
How to Restore to Stock Samsung Galaxy S7 SM-G930W8
Step 1: Download and Install Samsung USB Driver on Your Computer
Visit the DriverDosh to download the latest samsung usb driver v1.5.63.0. Once drivers are installed, it is highly recommended that you restart your computer.
Step 2: Download the Stock ROM/Original Firmware Galaxy S7 SM-G930W8
Go to this page to download the latest stock nougat firmware for Galaxy S7 SM-G930W8 (XAC) Canada. After downloading the firmware, you need to extract or unzip it to get the firmware file with .tar or .tar.md5 extension and place at a location where you can easily locate it in your computer.
Step 3: Download and Extract Odin Tool on Your Computer
You can download Odin3 v3.12.7 directly from DriverSpace. After downloading it on your computer, extract it to Desktop or another location you'd prefer.
Note:
Samsung Kies is not compatible with Odin Samsung. You have to make sure that Kies is not running in your system tray. It is recommended to uninstall Kies before using ODIN.
After extracting, right click to open "Run as administrator". It may prevent certain issue from happening.

Step 3: Boot Galaxy S7 SM-G930W8 to Download Mode
Make sure your Galaxy S7 SM-G930W8 is disconnected from your computer. Then, boot your phone into the download mode. To do so, power off your device and then press and hold the Volume Down + Home + Power buttons at the same time. Keep the keys pressed until you see the warning screen and then press the Volume Up key to enter the Download/Odin Mode.

Step 4: Connect your Galaxy S7 SM-G930W8 to Computer
You device should be automatically recognized by Odin. At the lower-left of Odin interface, it should show a message that says "Added!" and in the meantime you should see a light-blue box at the ID:COM section stating "COM:3" (the number depend on which USB port you have plugged the device cable and is irrelevant).

Keep in mind:
You cannot proceed until you get the “Added!!” message which confirms that Odin has recognized your device.
If you don’t get the “Added!!” message, you need to install/re-install the drivers again for your device, and you should use the original cable that came with your device.
Step 6: Click "AP" Button to Add tar.md5 File
Once the device is recognized, load the firmware file that you have extracted into Odin. To do so, click the AP button on Odin and then select the .tar.md5 file.

After adding the file, click "Start" button to begin the flashing process. Do not remove or operate on your device until finished or failed showed on Odin.

When the flashing process is done and if everything goes well, you should see a big green box saying "PASSED". By now, the device should be rebooted and it is safe to remove/unplug your device.
